Easy Guide To Create HTML Sitemap For Blogger
Are you trying to generate an HTML Sitemap for Blogger blog? Then you are in the right place. Follow the steps to create HTML Blogger sitemap page in Blogger.
 |
| HTML sitemap for Blogger |
Are you trying to generate a HTML Sitemap for Blogger blog? Then you are in the right place. There is a huge difference between HTML Sitemap and XML Sitemap.
What is XML Sitemap in Blogger?
XML Blogger sitemap is that page of your blog which is developed with the help of extensible Markup Language and has.xml extension. It is specially created for search engines.
XML sitemap is submitted to all the search engines to let them crawl and index Blogger blog which improves the blog's crawling and indexation rate.
Guide: Create XML sitemap for Blogger and submit it to search engines
What is HTML Sitemap in Blogger?
HTML Blogger Sitemap is a normal webpage with .html extension. It displays a list of all your published posts which can be organized by topics, labels or by published date.
HTML Blogger sitemap is basically created to help users to easily navigate and find all the published posts of your Blog.
For instance, check the HTML sitemap page of our blog, you can see all our published posts which are organized by labels. Isn’t that awesome? In this blog post, I’ll share a simple method to add Elegant HTML Sitemap for blogger.
Features of HTML sitemap page for Blogger
- Sorted alphabetically (A to Z).
- Lists blog posts based on labels.
- Automatically adds "New" tag to latest articles.
- Labels are neatly separated.
- A lightweight Javascript used.
- Beautiful color combination.
- Blog posts are numbered automatically on each labels.
- Easy for users to navigate through the posts.
How to generate HTML sitemap for Blogger Blog?
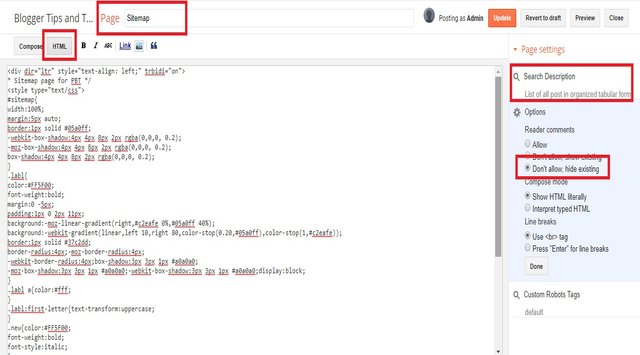
It is very easy to create HTML sitemap page. I have added codes of 2 HTML sitemap for Blogger. Select any one code and follow the below steps carefully to add it to your blog.
1. Log in to your blogger and go to the Dashboard.2. Go to Pages and create a new page and name it as "Sitemap".
3. Add Search description under page settings.
4. Click on Options, under Reader comments, select "Don't allow".
5. Now switch to HTML mode and clear all the default codes present.
4. Add the below code and if Blogger shows HTTPS error, just dismiss it.
5. Replace yourblog.blogspot.com with your blog URL.
8. Click on publish, and your done.
HTML sitemap style 1
* Sitemap page */
<style type="text/css">
#sitemap{
width:100%;
margin:5px auto;
border:1px solid #05a0ff;
-webkit-box-shadow:4px 4px 8px 2px rgba(0,0,0, 0.2);
-moz-box-shadow:4px 4px 8px 2px rgba(0,0,0, 0.2);
box-shadow:4px 4px 8px 2px rgba(0,0,0, 0.2);
}
.labl{
color:#FF5F00;
font-weight:bold;
margin:0 -5px;
padding:1px 0 2px 11px;
background:-moz-linear-gradient(right,#c2eafe 0%,#05a0ff 40%);
background:-webkit-gradient(linear,left 10,right 80,color-stop(0.20,#05a0ff),color-stop(1,#c2eafe));
border:1px solid #37c2dd;
border-radius:4px;-moz-border-radius:4px;
-webkit-border-radius:4px;box-shadow:3px 3px 1px #a0a0a0;
-moz-box-shadow:3px 3px 1px #a0a0a0;-webkit-box-shadow:3px 3px 1px #a0a0a0;display:block;
}
.labl a{color:#fff;
}
.labl:first-letter{text-transform:uppercase;
}
.new{color:#FF5F00;
font-weight:bold;
font-style:italic;
}
.postname{font-weight:normal;
background:-moz-linear-gradient(right,#C2EAFE 0%,#fff 40%);
background:-webkit-gradient(linear,left 80,right 10,color-stop(0.50,#fff),color-stop(1,#C2EAFE));
}
.postname li{border-bottom: #ddd 1px dotted;
margin-right:5px
}
</style>
<br />
<div id="sitemap">
<script src="https://amanbhattarai4400.github.io/csshosting/sitemap.js" type="text/javascript"></script>
<script src="https://yourblog.blogspot.com/feeds/posts/default?max-results=9999&alt=json-in-script&callback=loadtoc">
</script></div>
</div>HTML sitemap style 2
<div dir="ltr" style="text-align: left;" trbidi="on">

<style type="text/css">

.tb-sitemap {

    background-color: #222;

    color: #ddd;

    font-family: Verdana,Geneva,Tahoma,Arial,Sans-serif;

    font-size: 14px;

    font-weight: 410;

    overflow: hidden;

    border-radius: 5px;

    box-shadow: 0 0 9px rgba(0,0,0,.1);

}

.tb-sitemap .toc-header {

    color: #fff;

    font-family: inherit;

    font-weight: 410;

    font-size: 14px;

    background-color: #1A1B1E;

    margin: 0;

    padding: 13px;

    overflow: hidden;

    cursor: pointer;

    border-top: 1px solid #5c5c5c;

    border-bottom: 1px solid #5c5c5c;

    transition: initial;

}

.tb-sitemap .toc-header:hover {

    background: rgb(0,52,52);

    background: linear-gradient(90deg, rgba(0,52,52,1) 19%, rgba(3,106,30,1) 38%, rgba(0,182,182,1) 100%);

}

.tb-sitemap .toc-header:before {

    content: '';

    width: 0;

    height: 0;

    position: relative;

    float:right;

    top: 10px;

    right: 10px;

    border: 5px solid transparent;

    border-color: #aaa transparent transparent;

    transition: all .3s ease;

}

.tb-sitemap .toc-header.active {

    background: #1a1b1e;

    color: #fff;

}

.tb-sitemap .toc-header.active:before {

    border-color: #fff transparent transparent;

    top: 5px;

    -webkit-transform: rotateundefined-180deg);

    -moz-transform: rotateundefined-180deg);

    -ms-transform: rotateundefined-180deg);

    -o-transform: rotateundefined-180deg);

    transform: rotateundefined-180deg);

}

.tb-sitemap .loading {

    display: block;

    padding: 14px;

    text-decoration: blink;

}

.tb-sitemap ol {

    margin: 0;

    padding: 0;

    list-style: none;

    transition: initial;

}

.tb-sitemap li {

    counter-increment: step-counter;

    line-height: normal!important;

    margin: 0!important;

    padding: 7px 7px 7px 16px!important;

    white-space: nowrap;

    text-align: left;

    overflow: hidden;

    transition: initial;

}

.tb-sitemap li:first-child {

    background: rgb(0,52,52);

    background: linear-gradient(90deg, rgba(0,52,52,1) 19%, rgba(0,0,0,1) 38%, rgba(71,62,62,1) 100%);}

.tb-sitemap li:nth-child(2n) {

    background: rgb(71,62,62);

    background: linear-gradient(90deg, rgba(71,62,62,1) 19%, rgba(0,0,0,1) 38%, rgba(0,52,52,1) 100%);}

.tb-sitemap li:nth-child(2n+3) {

    background: rgb(0,52,52);

    background: linear-gradient(90deg, rgba(0,52,52,1) 19%, rgba(0,0,0,1) 38%, rgba(71,62,62,1) 100%);}


.tb-sitemap li::before {

    content: counter(step-counter)'.';

    margin-right: 5px;

}

.tb-sitemap a {

    color: #fff!important;

    text-decoration: none;

    font-size: 90%;

    transition: initial;

    font-weight:normal!important;

}

.tb-sitemap a:visited {

    color: #fff!important;

    transition: initial;

}

.tb-sitemap a:hover,.tb-sitemap a:visited:hover {

    color: #fff!important;

    text-decoration: underline!important;

    transition: initial;

}

</style>


<div class="tb-sitemap" id="tb-sitemap">

<span class="loading">Sitemap Loading..</span>

<script type="text/javascript">

var toc_config = {

 url: 'https://yourblog.blogspot.com',

 containerId: 'tb-sitemap',

 showNew: 12,

 newText: ' <strong style="font-weight:normal;font-style:normal;color:#000;font-size:11px;background:#fff000;padding:1px 6px 3px 6px;line-height:normal;float:right;border-radius:3px;">New!</strong>',

 sortAlphabetically: {

  thePanel: true,

  theList: true

 },

 maxResults: 9999,

 slideSpeed: {

  down: 400,

  up: 400

 },

 slideEasing: {

  down: null,

  up: null

 },

 slideCallback: {

  down: function() {},

  up: function() {}

 },

 clickCallback: function() {},

 jsonCallback: '_toc',

 delayLoading: 0

};

</script>

<script src="https://amanbhattarai4400.github.io/twistblogg/sitemap.js" type="text/javascript"/></script>

</div>

</div>
Conclusion
I hope with the help of this post you have understood what is the difference between XML sitemap for Blogger and HTML sitemap for Blogger.
Do let me know in the comments section, if you need my help to add HTML sitemap for blogger and if you have any questions or have suggestions regarding blogging then please do share with us!
I hope you like this tutorial on how to create HTML sitemap for Blogger, if you find any issues then do comment below!

1 comment